
Learn how to design a custom crystal chandelier with expert tips on sizing, crystal selection, installation, and maintenance for stunning, lasting results.
TL;DR:
- Proper planning and precise measurements are essential for a stunning custom chandelier.
- High-quality crystals like Swarovski provide superior brilliance and long-term value.
- Safe installation and regular maintenance keep your chandelier looking beautiful and functioning well.
A custom chandelier can be the single most transformative element in a room, yet so many beautiful projects go sideways before the first crystal is hung. Wrong sizing, mismatched materials, and skipped installation steps are the most common culprits. Whether you’re designing a showpiece for a grand foyer or a statement fixture above a dining table, the difference between breathtaking and disappointing comes down to planning. This guide walks you through every stage, from measuring your space and selecting crystals to wiring, hanging, and maintaining your finished piece, so you can execute with confidence and get stunning results the first time.
Key Takeaways
| Point | Details |
|---|---|
| Size with precision | Calculate chandelier diameter using room dimensions and always adjust for ceiling height and table clearance. |
| Prioritize quality materials | Choosing the right crystal and hardware elevates both appearance and durability. |
| Design for both form and function | Blending aesthetic appeal with practical lighting needs ensures a timeless centerpiece. |
| Prepare for installation | Gather all tools and spare parts and follow a stepwise, safety-first approach to chandelier assembly. |
| Maintain brilliance year-round | Regular cleaning and ordering extra crystals guarantee your chandelier’s lasting sparkle and reliability. |
Assessing your space and requirements
Before you sketch a single design idea, you need hard numbers. A chandelier that looks perfect in a showroom can feel oppressive in a low-ceilinged bedroom or lost in a double-height entryway. Getting the dimensions right is the foundation everything else rests on.
The most reliable starting point is the standard sizing formula: add your room’s length and width in feet, and that sum becomes the chandelier’s ideal diameter in inches. A 14 ft x 16 ft dining room calls for a fixture roughly 30 inches wide. From there, you adjust based on ceiling height and placement.
Ceiling height changes everything. For dining tables, maintain 30 to 36 inches of clearance between the bottom of the fixture and the tabletop. For entryways and foyers, 7 ft minimum clearance from the floor is the accepted benchmark, with taller ceilings allowing more dramatic, elongated designs. Traffic flow matters too. A foyer chandelier that brushes tall guests or interferes with an open door is a problem you can’t fix after installation.
Use our chandelier design guide to map out your measurements before committing to a design direction.
Key room features to document before you design:
- Room dimensions (length, width, ceiling height)
- Ceiling type (flat, vaulted, coffered, sloped)
- Electrical box location and load capacity
- Natural light sources and existing artificial lighting
- Furniture placement and traffic paths
- Architectural style (modern, traditional, transitional)
| Room type | Recommended diameter | Min. floor clearance |
|---|---|---|
| Dining room | Length + width (ft) = diameter (in) | 30-36 in above table |
| Foyer/entryway | Proportional to ceiling height | 7 ft from floor |
| Living room | Larger scale, 36-60 in typical | 7 ft from floor |
| Bedroom | Smaller scale, 18-24 in typical | 7 ft from floor |
Pro Tip: Before ordering a single part, cut a cardboard circle to your target diameter and hang it at the intended height using string. Walk around it, sit beneath it, and open nearby doors. This low-tech mock-up catches sizing problems that even the best 3D apps miss.
For inspiration on how different chandelier styles and impact vary by room type, browsing real project examples early in your planning process helps you avoid designing in a vacuum.
Choosing materials and crystal types
Once your space needs are clear, it’s time to pick materials that define both quality and style. The crystals you choose will determine how light behaves in the room, and the hardware finish will anchor the fixture’s visual identity.

Not all crystals perform equally. Swarovski crystals are the gold standard, cut with extreme precision for maximum light refraction and brilliance. K9 optical glass is a popular and more affordable alternative that still delivers impressive sparkle. Rock crystal, which is natural quartz, offers a raw, organic look with excellent clarity but comes at a premium price. Check out crystal styles examples to see how each type looks in real installations.
| Crystal type | Sparkle level | Cost | Best for |
|---|---|---|---|
| Swarovski | Exceptional | High | Luxury residential, hospitality |
| K9 optical glass | Very good | Moderate | Most custom projects |
| Rock crystal | Excellent, organic | Premium | High-end, artisan designs |
| Acrylic | Low | Budget | Temporary or outdoor use |
For a detailed breakdown, our chandelier crystals compared guide covers cut types, clarity grades, and sourcing tips side by side.
Steps to select and verify your materials:
- Identify your style direction (traditional, contemporary, transitional).
- Set a realistic per-crystal budget and calculate total quantity needed.
- Request samples before ordering in bulk. Hold them under your room’s actual lighting.
- Inspect for consistency in cut, clarity, and hole size across the batch.
- Confirm hardware finish compatibility with your room’s existing metals.
- Source from verified suppliers who can guarantee authenticity and reorder availability.
Hardware finish is often underestimated. Polished chrome reads as modern and cool. Antique brass adds warmth and traditional elegance. Matte black creates bold contrast. The frame should feel like a natural extension of your room’s existing fixtures and furniture hardware.
Pro Tip: When choosing bulbs, LEDs save $95/year compared to incandescents and last far longer. Pair them with a CRI of 90 or higher to render crystal sparkle as naturally as possible. Warm white (2700K to 3000K) is the most flattering for residential spaces.
Our guide on how to choose chandelier parts walks through every component from pins and wire to bobeches and finials.
Designing for function and aesthetics
With your materials chosen, focus shifts to integrating both form and function in your design. A chandelier that looks stunning in a rendering but delivers uneven light or feels visually heavy in person is a design failure, even if every individual piece is beautiful.
Start with a functional checklist before finalizing any aesthetic decisions.
Design balance checklist:
- Light output: Does the fixture provide enough lumens for the room’s purpose?
- Size: Does the diameter match your sizing formula result?
- Symmetry: Are crystal drops and arms balanced visually from all angles?
- Style harmony: Does the fixture complement the room’s architecture and furnishings?
- Focal point: Is the chandelier the room’s hero, or is it competing with other elements?
- Dimmer compatibility: Is the fixture wired for a dimmer switch?
For custom chandelier planning that goes beyond a basic sketch, consider using free 3D room planning tools or working with a lighting designer for complex projects. Even a rough hand sketch with annotated measurements is far better than designing purely in your head.
One of the most common design mistakes is ignoring how the chandelier looks when it’s off. During the day, your fixture is a sculpture. The silhouette, the hardware finish, and the arrangement of crystals need to hold up in natural light without electricity doing any of the visual work.
Pro Tip: Always wire your chandelier for a dimmer, even if you don’t install one immediately. Dimmable fixtures allow you to shift the room’s mood from bright and functional to warm and intimate. Layer the chandelier with recessed or wall-mounted accent lighting so you’re not relying on a single source.
The sizing formula adjustment for ceiling height is critical here too. A room with 10 ft ceilings can handle a more elongated fixture than an 8 ft ceiling, and that vertical proportion changes the entire feel of the design. Explore different designing with style approaches to find a silhouette that works for your specific ceiling height.
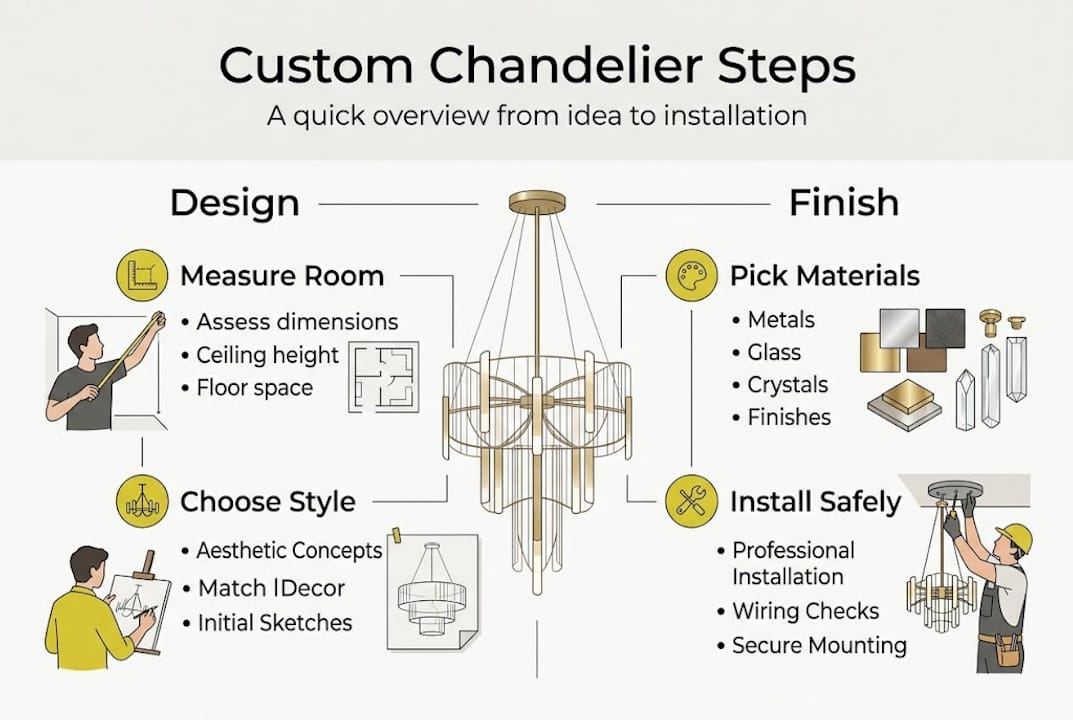
Installation, maintenance, and troubleshooting
After perfecting your design, executing the installation safely and planning for upkeep is crucial. A beautiful chandelier that’s poorly hung or neglected within a year is a costly disappointment.
Assembly and mounting steps:
- Turn off power at the breaker and verify with a voltage tester before touching any wiring.
- Confirm your ceiling electrical box is rated for the fixture’s weight. Most standard boxes hold 35 lbs. Heavy chandeliers require a fan-rated or structural box.
- Assemble the frame and canopy on the floor before lifting.
- Attach crystals starting with largest drops at the bottom and working upward, alternating sides to maintain symmetry. Use cotton gloves to avoid fingerprints and needle-nose pliers for tight connections.
- Have a second person assist when lifting and securing the fixture to the ceiling mount.
- Restore power and test all bulbs before completing the final crystal arrangement.
Safety note: Never work on a live circuit. If your ceiling structure is uncertain or the fixture exceeds 50 lbs, hire a licensed electrician for the mounting phase. A falling chandelier is not just a design loss, it’s a serious safety risk.
For a full walkthrough, our installation step-by-step guide covers every connection point in detail.
Maintenance and cleaning essentials:
- Clean crystals with a 50:50 alcohol and distilled water mix applied with a lint-free cloth or spray.
- Schedule a deep clean one to two times per year, or more often in kitchens or high-traffic areas.
- Dust lightly with a soft brush monthly to prevent buildup between deep cleans.
- Check all pins, wires, and connectors annually for signs of loosening or corrosion.
- Replace burned bulbs promptly. Uneven lighting stresses other bulbs and distorts the fixture’s look.
For troubleshooting, the most common issues are loose crystals, flickering bulbs, and uneven drop lengths. Always order 10 to 15% extra crystals at the time of your original purchase. Matching crystals from a different production batch is harder than it sounds, and having spares on hand makes repairs seamless. Our maintenance guide covers every scenario from a single broken drop to a full fixture refresh.
What most guides get wrong about custom chandeliers
Most resources treat custom chandelier design as a purely technical exercise: measure, select, install, done. That approach produces technically correct fixtures that feel oddly lifeless. Here’s what experience actually teaches.
Copying a catalog design is the fastest route to a forgettable result. Catalogs are designed to appeal to everyone, which means they’re optimized for no one in particular. The most memorable chandeliers come from decisions that are specific to a space, a client, and a moment.
Spending more on quality crystals and proper LED drivers upfront is almost always the right call. The difference in sparkle between authentic Swarovski and budget alternatives is visible from across the room. And when you compare crystal types honestly, the long-term cost of replacing cheap crystals that yellow or chip far exceeds the initial savings.
Small installation oversights, like skipping the spare crystal order or ignoring fixture weight limits, create expensive problems later. Treat your chandelier as functional art. Every decision, from crystal cut to hardware finish to hanging height, is a creative choice that shapes how people feel in the room.
Bring your custom chandelier vision to life
You now have a clear path from empty ceiling to a finished fixture that earns a reaction every time someone walks into the room. The next step is sourcing materials you can trust.
At Crystal Place, we’ve been supplying authentic Swarovski and premium crystal chandelier components since 1991. Whether you need individual crystal drops, bobeches, finials, or a complete set of crystal chandelier parts for a new build or repair, we carry the full range with free shipping on orders over $22 in the USA. Our team understands custom projects from the inside out and can help you source exactly what your design calls for, down to the last pin.
Frequently asked questions
How do I determine the right size for a custom chandelier?
Add room length and width in feet to get the ideal chandelier diameter in inches, then adjust up or down based on ceiling height and whether it hangs above a table or in open space.
Which type of crystal is best for chandeliers?
Swarovski and K9 crystals lead the field for brilliance and durability, but your budget and overall design style should guide the final call. See a side-by-side breakdown in our top chandelier crystals comparison.
How should I clean and maintain my custom chandelier?
Spray crystals with a 50:50 alcohol and distilled water solution and wipe with a lint-free cloth. Plan a thorough deep clean one to two times per year to keep brilliance at its peak.
How many extra crystals should I order for my chandelier?
Order 10 to 15% more crystals than your design requires. Matching replacements from a later production batch is difficult, and having spares on hand makes future repairs fast and seamless.
Are LED bulbs suitable for use in crystal chandeliers?
Absolutely. LEDs with a CRI of 90 or higher maximize crystal sparkle and save roughly $95 per year compared to incandescent bulbs, making them the smart choice for both performance and efficiency.
Recommended
- Custom chandeliers: transform any space with crystal elegance – CrystalPlace
- Custom Crystal Chandeliers Explained: Style and Impact – CrystalPlace
- Custom crystal chandelier design guide for interior success – CrystalPlace
- How to Install Chandelier Crystals for Stunning Results – CrystalPlace
- Step-by-step custom drapery workflow for flawless results – Fabric Store in Columbia, SC | Drapery Making Services