

Discover what is crystal assembly and enhance your décor skills. Learn how to create stunning pieces with detailed insights and practical tips.
What crystal assembly means and why it matters
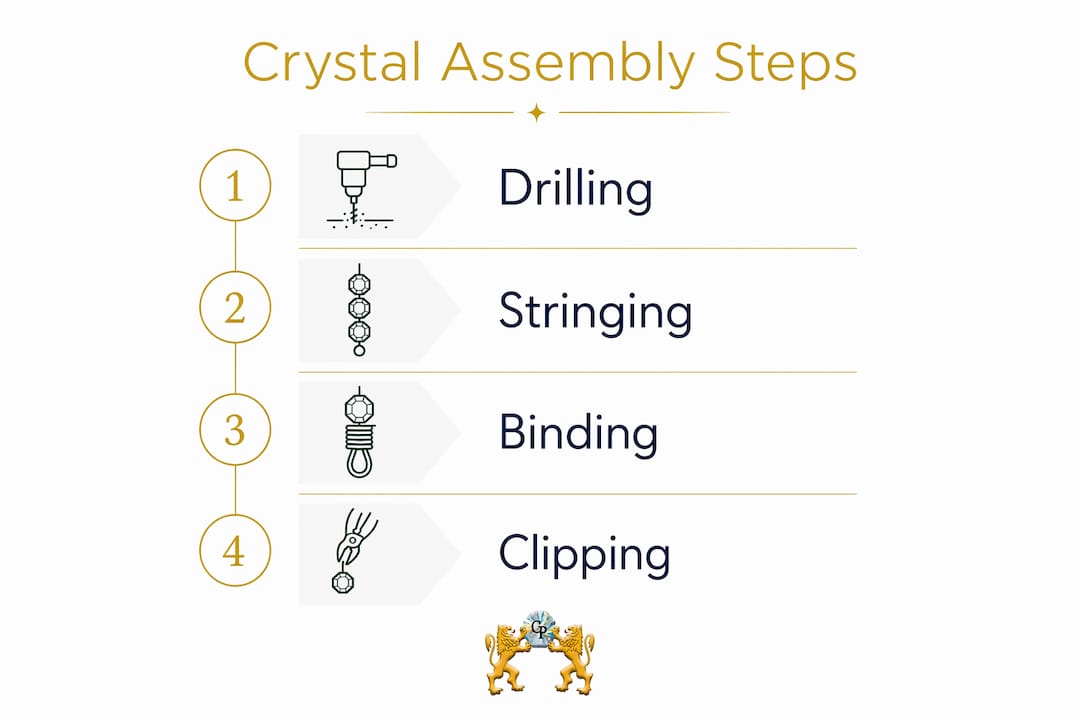
Crystal assembly is the process of connecting and arranging individual crystal components — prisms, drops, garlands, clips, and wires — into finished decorative pieces like chandeliers, wall sconces, and hanging accents. The goal is always two things at once: a piece that looks stunning and holds together safely over years of use.
The core components you’ll work with include:
- Prisms and drops — the light-catching elements that define the fixture’s sparkle
- Garlands — strands of linked crystals that drape between arms or frames
- Brass wire and pins — the binding agents that hold individual crystals in sequence
- Clips — polished or nickel-plated fasteners that snap crystals onto frames or garland strands
- Connectors and bobeches — structural rings and cups that anchor garlands to chandelier arms
Precision matters at every step. Even a millimeter of inconsistent spacing between crystals is highly noticeable on a finished chandelier. Crystalplace, with over 30 years of expertise supplying authentic Swarovski prisms and specialty assembly components, emphasizes that careful component selection is as important as the assembly technique itself.
Common crystal assembly methods and the materials behind them
Three primary techniques define how crystals get joined into decorative arrangements, and each produces a noticeably different result.
Hand-binding with brass wire is the most traditional approach. A craftsman threads thin brass wire through each crystal’s drilled hole and twists it to the next piece by hand. The result is a visually lighter garland with a delicate, airy quality that suits Swedish and traditional chandelier styles.
Clip assembly uses pre-formed brass or nickel-plated clips that snap through crystal holes and lock onto a strand or frame. Clips produce a more defined, substantial silhouette — the look associated with Baroque and Secession-style chandeliers. Clip compatibility depends on the crystal’s hole diameter, so matching clip size to crystal spec is non-negotiable.

Pin attachment involves small metal pins bent through a crystal’s hole and hooked onto the chandelier frame directly. This is the standard method for hanging individual drops and prisms from arms or rings.
Key material considerations:
- Brass clips (polished or nickel-plated) resist corrosion and maintain assembly strength over time
- Wire gauge affects both flexibility and durability — too thin and it fatigues; too thick and it’s difficult to work through small holes
- Crystal hole size must match the clip or wire diameter for a secure, rattle-free fit
“Hand-binding with thin brass wire produces visually lighter crystal garlands, while clip assembly results in more massive, defined silhouettes. Wire binding favors traditional aesthetics; clips suit styles like Secession or Baroque chandeliers.” — Zavadski LLC production team
Practical tips for assembling and maintaining crystal décor
Good assembly habits prevent the two most common failures: crystals that fall and crystals that look uneven. Here’s what experienced assemblers do differently.
Assembly best practices:
- Lay all components out before you start — sort by size, type, and finish
- Work from the bottom of a chandelier upward so your hands don’t knock already-hung pieces
- Use needle-nose pliers and wire cutters designed for fine work; clean wire cuts signal quality craftsmanship
- Maintain consistent tension on each wire twist — loose wraps loosen further over time
- Check every clip and pin for full closure before moving to the next crystal
Maintenance and care:
- Clean crystals with a solution of one part isopropyl alcohol to three parts distilled water, applied with clean cotton gloves
- Inspect attachment points every six months; a loose pin caught early costs nothing to fix
- For deeper restoration needs, Crystalplace offers specialized cleaners and repair products designed to preserve brilliance without damaging crystal surfaces
Safety precautions:
- Confirm your ceiling junction box is rated for the chandelier’s total weight before hanging anything
- Never attach crystals to a frame that isn’t already securely mounted
- Handle large prisms with cotton gloves to prevent oils from etching the surface
Pro Tip: Minimize wire waste by pre-cutting lengths to a consistent size before you start. It keeps spacing uniform and prevents the temptation to stretch a short piece, which weakens the connection.
How assembly technique shapes the look and structure of your fixture
The method you choose doesn’t just affect aesthetics — it changes how weight distributes across the entire fixture.
Wire-bound garlands are lighter and flex slightly, which works well on fixtures with multiple draping strands. Clip-assembled garlands are stiffer and heavier, so they need stronger attachment points and a frame built to handle the load. Placing heavy clip-assembled garlands on a frame designed for wire-bound strands can cause the arms to sag or the whole fixture to hang unevenly.
Symmetry is the other structural factor people underestimate. Even spacing and balanced crystal counts on each arm keep a chandelier level. An off-balance fixture doesn’t just look wrong — it puts uneven stress on the mounting hardware. For chandelier crystal installation, distributing weight evenly across all arms before finalizing any attachment is standard practice.
Assembly style also determines which chandelier types a garland suits:
- Wire-bound: Swedish, traditional, and French styles
- Clip-assembled: Baroque, Secession, and ornate Victorian designs
- Pin-hung drops: Universal — works across virtually every chandelier style
What components and tools you actually need
Before sourcing anything, know what a complete assembly kit looks like.
Crystal components:
- Prisms (various cuts: octagon, pendeloque, teardrop)
- Garland strands (pre-assembled or loose-link)
- Drops and pendants
- Connectors and jump rings
- Bobeches and column spacers
Hardware:
- Brass clips — polished or nickel-plated, sized to crystal hole diameter
- Brass wire — fine gauge for hand-binding
- Steel pins for direct frame attachment
Tools:
- Needle-nose pliers (two pairs for opening and closing jump rings)
- Wire cutters or nippers with a clean cutting edge
- Cotton gloves for handling finished crystals
- A soft work surface to prevent chips during layout
For sourcing quality components and choosing chandelier crystals that match your fixture’s style, Crystalplace carries the full range — from authentic Swarovski prisms to its own Magnificent Crystal Brand line, plus all the clips, pins, and connectors the assembly process requires. Lighting component suppliers like Novelty Lights also carry complementary hardware worth comparing when you’re building out a full assembly kit.
How crystal joining techniques differ: drilling, stringing, and gluing
Each joining method suits a different application and crystal type.
Drilling creates a clean hole through a crystal for wire or pin insertion. Factory-drilled crystals from reputable suppliers have precise, smooth holes that won’t crack under tension. Attempting to drill crystals at home risks shattering them — always source pre-drilled components.
Stringing threads crystals onto a continuous wire or cord, often with small spacer beads between pieces. It’s the basis of garland construction and works best when crystals have consistent hole sizes. Uneven holes cause the strand to twist and the crystals to sit at odd angles.
Gluing is typically a last resort — used to attach flat-backed crystals to surfaces where drilling isn’t possible. Epoxy adhesives bond well to glass, but glued crystals can’t be repositioned and are harder to replace when damaged. For structural chandelier work, mechanical attachment (wire, clips, pins) is always preferable.
How to assemble a crystal chandelier step by step
- Mount the bare frame first. Secure the chandelier frame to a properly rated ceiling junction box before touching a single crystal.
- Sort crystals by type and size. Group prisms, drops, and garland sections separately so you’re not hunting mid-assembly.
- Attach garlands to the lowest tier first. Working bottom to top keeps finished sections out of your way.
- Hang individual drops next. Use pins or clips to attach prisms to each arm, checking symmetry as you go.
- Step back and assess balance. An uneven fixture is easier to correct before you’ve closed every clip.
- Inspect every attachment point. Tug gently on each crystal — nothing should shift or rattle.
- Power on and check the light. Crystals that aren’t seated correctly will catch light unevenly, making the problem immediately visible.
Troubleshooting common assembly problems
Crystals rattling: The clip or wire isn’t fully closed. Open it, reseat the crystal, and close it completely.
Uneven spacing in a garland: Usually caused by inconsistent wire tension during binding. Re-bind the affected section with uniform twist counts between each crystal.
Fixture hanging crooked: Weight distribution is off. Count crystals per arm and rebalance before assuming the mounting hardware is the problem.
Crystals losing sparkle quickly: Fingerprint oils are the usual culprit. Assemble with cotton gloves and clean with an alcohol-distilled water solution immediately after installation.
Pins bending or breaking: The pin gauge is too light for the crystal weight. Switch to a heavier pin or use a clip instead.
Why crystal quality directly affects your assembly choices
Lower-quality crystals often have irregular hole sizes, rough edges around the drill point, and inconsistent dimensions. All three problems compound during assembly. An irregular hole lets the wire or clip shift, which means the crystal hangs at an angle. Rough drill edges create stress points that crack under repeated vibration. Dimensional inconsistency makes even spacing nearly impossible.
High-lead-content crystal (such as authentic Swarovski) is denser and heavier than standard glass, which affects clip and wire selection. Heavier crystals need brass-only clips and heavier-gauge wire to stay secure long-term. Crystalplace’s focus on authentic Swarovski prisms and its own Magnificent Crystal Brand reflects exactly this principle — the assembly method only works as well as the component quality underneath it.
Key Takeaways
Crystal assembly combines precise technique, compatible materials, and quality components to produce decorative fixtures that are both beautiful and structurally sound.
| Point | Details |
|---|---|
| Method determines aesthetics | Wire-binding creates lighter garlands; clip assembly produces heavier, more defined silhouettes. |
| Clip and hole compatibility | Brass clip size must match crystal hole diameter for a secure, rattle-free fit. |
| Spacing precision matters | Even millimeter differences in crystal spacing are highly noticeable on finished chandeliers. |
| Quality affects technique | High-quality crystals with consistent holes and dimensions make every assembly method more reliable. |
| Safety starts at the ceiling | Secure the bare frame to a rated junction box before attaching any crystals. |
Recommended
- How to Assemble Crystal Garlands: A DIY Guide – CrystalPlace
- The Role of Crystals in Interior Design: 2026 Guide – CrystalPlace
- Crystal Terminology Explained: A Decorator’s Guide – CrystalPlace
- How to Design Crystal Centerpieces for Elegant Events – CrystalPlace